Tuesday, August 19, 2014

Beauty V/Blogger/Guru Spotlight: Post 2

Alright, here is numero dos in my series of spotlight posts on the beauty v/blogger/gurus I am just loving these days! For a small intro and to read up on my first spotlight pick, head on over to the first post!

Spotlight 2: Allison Anderson (Amarixe)


Allison is a beauty video creator, blogger, and photographer. She puts clear love and care into the photos on her blog and her undergrad studies in communications shine in all her work. She always includes a really nice mix of drugstore and high end products (though she's been leaning more high end lately), and her makeup style tends to be more neutral/natural than anything else. Additionally, she includes content on items beyond just makeup, including beauty things (like skincare and hair products), as well as fashion (just here and there), household wares (like candles), and various other "lifestyle favorites." As I've already pointed out in my first post, I'm not too adventurous when it comes to makeup, so it's nice to have someone discussing products that I am naturally drawn to anyway. Plus, everything else she includes almost always seem to be things I really enjoy or think I might like. We are just very similar, which makes watching her highly enjoyable (at least for me).

Out of all the beauty peeps I follow, I think Allison is closest to me "looks wise," (and in lots of other ways) though her coloring is warmer than mine (except for the eye department, where she leans cool, and I lean warm. D'oh!). She also used to comment that her skin was pretty dry, but I haven't heard her mention that lately (maybe because it's summer), and my skin definitely leans toward the parched end of the spectrum. Her hair is naturally closer to my color, and texture wise, it is also similar in that it is quite fine (though hers holds styling way better than mine does). I find it really helpful to follow people who are similar to myself in whatever ways I can find so I can get a better sense of how products might look on me, or how my skin may react to them given what I know about the person I am watching. It's like having someone try products out for me without me having to spend money on them. Winning!

Because of the clear work and effort Allison puts into her videos and posts, she doesn't crank content out like some other people. While I wish she made more videos (yeah...I have a problem), I would rather have fewer posts and videos that include amazing lighting, wonderful editing, gorgeous photos, and professional content than the other way around. I also can't think of a specific time when I remember a video clearly being sponsored, which I really really appreciate, as I lose confidence in opinions quickly when that starts to happen regularly. (Note: it's not that I don't want these ladies to be successful; it's great when this becomes more than a hobby for these guys! It just makes it difficult to know their true opinions on products because, while they always "give their real opinion," it's magical how sponsored products just always seem to be 100% perfectly awesome without a flaw in the world. Just my opinion.)

Allison is probably my favorite guru and blogger; she is always professional, but relatable, and she comes across as a genuinely caring, kind, and well-educated chick who you'd be friends with in real life. I was devastated to read her most recent blog post where she announced her heart breaking personal family situation. My stomach really felt like it dropped to my feet when I read the post. My heart goes out to her, her mother, and her whole family; I just can't imagine what they are going through right now. Please send some good vibes their way.

Like all my spotlight peeps, I totally recommend you check her out!

What about you? Who are you crushing on these days beauty v/blogger/guru wise?


Wednesday, August 13, 2014

Getting to Know my DSLR


Well, technically it's not mine...it's my boyfriend's. But anywho.

One of my goals for this year is to improve my photo skillz. Technology has made taking amazing photos more and more possible for the everyday public than ever before. And especially since we're in the digital world, there's no worry of wasting film, so you can screw up as many times as you want with no impact on your film stash or wallet. Score!

However, despite having potential to do awesome things, DSLR cameras are a bit...overwhelming. And while I usually am a manual girl, flipping through pages upon pages with no glossy photos to help me has proven to be ineffective for this particular venture. So I have been doing some online learnin'. And I thought I would share the most helpful resource I've found...and it may be as surprising for you as it was for me, because it's Ree Drummond. Yeah, like the woman on Food Network.


Ironically, she did not take that photo because she is in it. Moving on to her photos and helpful stuff...

It took me a while to find Ree's photography section on her website because it isn't prominent, which I still don't understand because it's AWESOMESAUCE (unintentional food pun). I'm guessing it's because she doesn't really write about photography too much anymore because she is super busy with her foodie life. However, it's still there, just not easy to find. On her website, if you scroll all the way to the bottom until you get to the tannish/yellow box, there is a column that says "PW Links." Click on "Pioneer Woman Photography," and you're there! Alternatively, you can use the Googlez, which is how I returned to this section repeatedly after finding it on Pinterest or some other blog...can't remember.

Ree's posts are awesome because they aren't too wordy or overly long, and they include pictures to break it up and demonstrate what she is talking about. Her writing style is easy and silly. The most helpful series I have found is her "What the Heck is an Aperture" series, which is a group of 4 blog posts that helped whip my brain back into shape after my high school photography class info turned to mush. I've also really enjoyed her post on Exposure Compensation, which I had never ever even heard of until I saw this post. Just these 5 blog posts have helped my photography skills take a ginormous leap forward in only a few days (but I mean...I'm no pro. Let's not get too serious here.) I totally recommend you check them out! Ree is the bomb dot com.

JUST LOOK AT HER FOOD.

I'm hungry. Time for breakfast!

Tuesday, August 12, 2014

Beauty V/Blogger/Guru Spotlight: Post 1

I have a problem. I'm addicted to beauty v/blogger/gurus.

Guys, it's bad. I know their posting schedules and get annoyed when I have no new vids to watch. I go through withdrawal when any of them go on a rare vacation. My boyfriend knows half of their names because I talk about them in real life. Also, they make me buy stuff.

When I discovered the beauty YouTube community, it was like eating cream cheese frosting by the bucket and never feeling sick or getting fat. Or like angels were all floating above my head singing Adam Lavigne songs and delivering puppies into my lap. I had no idea it was there, but once I found it, I couldn't stop watching.


In reality, it was this weird accident where I googled "smokey eye tutorial" and I randomly clicked on a video that led to another video...and another million more and I have been hooked ever since. Growing up in a family of sciency nerdos, my affection for makeup was not exactly...understood (read: my family thinks beauty products are for suckers). So I suddenly found a whole world of people who were into makeup, but were also normal everyday people like me. Like so many people in the YouTube community say, I just felt like I had a connection with these people, like I had found other "mes" out there. It was awesome.

Since then, I've refined my subscriptions and reading to people I like best. I mostly gravitate toward people who:

  • aren't (obviously) over sponsored
  • post regularly (and often, at least once a week)
  • often do reviews
  • provide a mix of everyday makeup with special occasion stuff sprinkled in
  • focus mostly on drugstore products
  • put real work and effort into their work

I'm not adventurous in my personal makeup (neutrals all the way, baby), but I am learning to appreciate more and more looks that are pushing out of my own comfort zone (I tried the orange lip and wore it out of the house for about 30 minutes the other day before wimping out and wiping it off--progress!). I lean more toward those who focus on drugstore products, as I am just not ready to make the plunge into regular high end purchases; however, I don't mind some references to pricy products, especially when compared to similar drugstore items. I also tend to be drawn to people who aren't super young (high schoolers tend to be too immature for my taste, which isn't meant to be insulting...but I mean, they're 10 years younger than I am and just into different things). I have also noticed that I've mostly become pickier with video quality, and I pretty clearly prefer those who film with high quality sound and cameras (from what I can tell, DSLRs), and who carefully edit their footage. Lighting quality is really important to me when I watch videos. In other words, I appreciate those who work hard and take their beauty venture seriously.

Personality-wise, I notice I'm more drawn to those with calmer, more easy-going, but happy personalities. I find it difficult to watch a lot of people long term who are overly bubbly, too energetic, or create crazy choppy videos, as it tends to be mentally tiring for me...it also usually reads as fake, in my opinion. It's just not my taste. But that's not to say it can't be yours! You should always watch/read/follow who YOU like! :)

So, without further ado, here is the first in a series of posts about beauty v/bloggers/gurus that I am just hearting so much right now!

Spotlight 1: Emily Eddington (emilynoel83/Beauty Broadcast)


Emily's smokey eye tutorial was the original video I found that fateful day back in 2008 when I was googling around for some help. I just love her. She recently(ish) left her news anchor position to be a full time YouTuber and blogger, and she makes. so. many. videos. Seriously guys. She posts a review of a new product every weekday on her Beauty Broadcast Express channel, in addition to tutorials on her original channel multiple times a week, PLUS blog posts pretty much every weekday. It's insane!

My favorite event on Emily's channel/blog is "The Emily Awards" that she does each January where she picks her favorite high end and drug store product in every makeup category you could possible want. I reference this list religiously. She breaks it down into multiple sectors (face, eyes, lips, etc.), and puts so much care and consideration into her picks. She even tracks how often a product has won over time (yeah, she's been doing it that long!). Her dupes are also THE BOMB DOT COM. Unlike most gurus who discuss what I consider to be "dupes" (in quotations because they are somewhat similar, but really not true duplicate products), Emily's choices are spot on. Everything needs to line up in her book: color, texture, wear time--they are true dupes.

I also really appreciate (and I hope that on the off chance that she ever sees this post that does not take offense to this) that Emily is older than a lot of the hip beautiful gurus in college who often seem to be successful purely based on their painfully good-looks only. Emily is the real deal, and from what I can tell has never accepted a sponsorship (though she often reviews products sent to her for free), so I really trust her opinions. I just love her to pieces! Also, we have the same name, soooo...bonus.

Like all my spotlight peep posts, I totally recommend you check her out!

What about you? Who are you crushing on these days beauty v/blogger/guru wise?

Saturday, August 9, 2014

Review: Befine Exfoliating Cleanser

If you be looking for a serious physical exfoliator, have I found a scrub for you.


I've been using the Befine Exfoliating Cleanser for about a year on and off now. I ordered it online after doing some research for a new exfoliator that was well suited for dry and sensitive skin.

First off, let's take a moment to appreciate its simple packaging. The minimalist in me hearts this mucho. I no longer have the box it came in, but you can take my word on that being pretty and minimalist too (and cardboard for easy recycling). Why am I such a sucker for packaging? Marketing peeps must love consumers like me. But I digress.


Let's talk about this scrub. It comes in a 4 oz tube, which was enough for me to use once or twice a week for roughly a year, as I only used a little bit at a time (more on that in a minute). The smell isn't what I was expecting; I thought it would be sweet and sugary smelling, sort of like the vanilla scented sugar scrubs a la Bath and Body Works. It really doesn't have a sweet smell at all. It's more...earthy. It actually kind of reminds me of mushrooms with some herbs and a hint of lavender. That probably sounds horrendous, but it's really not that bad. Just don't expect sweet, because sweet it is not.


Now let's talk about texture. This is the. grittiest. scrub. ever. Like ever in the history of ever. When I read some reviews ahead of time and people commented on its scratchiness, I just thought, "Man, none of these people have ever used an exfoliator before. What a bunch of sissy-weenies!" But then I got it and when I smeared the first round on my face and went to work, I actually had to stop mid-wash to figure out what the heck was going on. This feels like sharp sandy bits scraping over your skin if you don't give the water a few seconds to chill everything out. That sounds terrible, I know. The key is getting your face nice and wet ahead of time, putting only a small amount on your face (hence, lasting me a year), and then gently spreading it out slightly. Then wait about 30 seconds. I'm guessing this allows the water to start to break down some of the sugar granules to soften those harsh edges, because it's so much better after a short wait. Depending on how scrubby you want your scrub to be, you can wait more or less time. Thirty seconds seemed just right to to me to still get that "dude I am so cleaning my face right now" feel without worrying I was scraping off a million layers of precious skin cells. Once it starts to get dissolvy (word?), it becomes more of a creamy texture that feels really nice; after about 15 seconds of massaging, the granules disappear altogether and you're left with a milky wash. Because of this wait time, and for the fact that I like to bring it on my neck and chest (scrub all the places!), I only use this bad boy in the shower. 'Cause...mess.


Overall, I like the way this makes my skin feel...at first. This scrub leaves my face nice and smooth. But despite my search for something really gentle on my dry skin, I still find this to leave my face feeling tight and parched, especially in the winter time. Its harsh texture means I only use it roughly (har har) once a week, though summer time may be closer to two times a week. It definitely doesn't do anything for acne (maybe scrape it off your face?), though keep in mind that it doesn't claim to. I give it props for mentally making me feel like I'm doing some serious cleaning duty.

All in all, as much as I love the packaging and its mostly natural ingredients, I won't be repurchasing this scrub. There are too many other things to try, and the $13 price tag (at least when I bought it) seems a little too high to me for something that is just average. If you like really scrubby scrubs though, I would give this a go--I've never found anything that comes even close to being so gritty!

What scrubs are you loving lately? Any recommendations on exfoliators to try next?


Thursday, August 7, 2014

Blog Upgrades

Welp, it's two years since my last post and I am back to blogging. I may or may not currently be unemployed, which may or may not be the reason I have time to do this again. Just sayin'.

Anywho, I wanted to share a video I came across that I found to be uber helpful in terms of understanding and learning how to do some social media icon tinkering on your blog. This video was particularly nice since she has a sweet trick that allows you to not need an outsourced photo host for your little logos. I feel so tricksy.

I scored my free icons from Carrie Loves. They are simple, but that is all I wanted for now. She has lots of color options and three size ranges, which is perfect for someone who just wants the basics, like moi. You download them in a zip package all at once and she has every icon under the sun, including things I didn't even know existed (clearly I have some social media catching up to do). I think I will eventually try and make my own icons down the road, but I am feeling so accomplished for even figuring out these icons' placement and linking that I feel I deserve a break. And maybe some chocolate. There was much fist pumping and cabbage patching when this all worked out.


Here's the vid if you need some help like I did! The girl's name is Emily, so obviously, it's an awesome tutorial.


Good luck!

Sunday, October 28, 2012

RVAdventurer!


Oh, snap! It's time for the first RVAdventurer post ever.

So what is RVAdventurer? (Note: RVAdventurer is not to be confused with RV Adventurer, which is about peeps doin' it up traveling around the good ol' US of A in their RVs...which is cool I guess, but not the same thing. At all.) RVAdventurer is a place for me to document my life in Richmond, VA, or "RVA" for those in the know. If you're a local, you probably recognize my logo, which is a pimped up mLeinked version of those bumper stickers that are EVERYWHERE in this city. My boyfriend and I finally got our mitts on our very own personal copies, so our cars are now the proud bumper-displayers of stickers of their very own. We've been trying to get these stickers for months and finally came across them at the Folk Festival. Woot. And that's what got the gears turning for RVAdventurer.

Jer and I have lived in Richmond for just over a year, although the first 12 months only half count because we were too scared to leave our apartment building half the time to enjoy life in the River City. However, after moving to the coveted Fan/Carytown/Museum District area about 2 months ago, we are ten bazillion times happier (and safer), and are finally seeing what it's like to be able to walk to a market, bar, festival, or restaurant without worrying about getting shot or mugged for the better 99.99999% of the commute. Woot.

But since we've lived here for a bit, we've discovered some sweet noms, green spaces, awesome annual events, and just unique aspects of Richmond that we love. So while I'll share new things that we find as we go, I figured I'd share what we've already come to love and look forward to in good ol' RVA. After making a mega list that grew and grew, I finally decided to break it down into some categories, including where to eat, shop, play, drink, and visit. And if you know me even a smidgen bit, you know where I'm going to start: with the grub. These aren't exactly listed in any specific order, but they are vaguely reminiscent of the order of my super-all-time-faves to my pretty-sweet-faves, as they're mostly in the order that they came to mind. So without further ado.

RVAdventurer: Where to Eat

  • Carytown Sushi   Oh Carytown Sushi, how do I love thee? Let me count the ways…amazing tea…cozy atmosphere…super cute pink-octopus-drawn-on-the-chalkboard…mini Connect-Fours on the tables…oh, and half-off (most) sushi on Tuesdays and Wednesdays from 5-7. Yes. Half. Everything is delicious, but the more unique rolls I like that I don’t think I’ve seen elsewhere are the seaweed salad roll and the sweet potato roll. So. So. Good. And affordable. Even Jeremy approves! (On a side note, all the wait staff know him as “5-Cucumber-Rolls-Please guy.” He gets that almost almost every week. One time he got 4 cucumber rolls and a carrot roll and I thought the waitress was going to die of shock. However, I encourage being a bit more adventurous because everything is awesome!)

  • Selba   This isn’t particularly dude-friendly, but this is my number one go-to spot when I have girl friends come to town. The portions are on the small side, but I haven’t eaten anything that caused me to say “Man, I wish I had gotten something else…” and I’ve tried a LOT. They have a pretty big selection of vegetarian and vegan options, plus some really interesting cocktails. I believe it’s characterized as “new American” food, but I think of it as just “really really awesomely good food.” If you like seafood, the scallops are ree-donk-u-lous. Plus, they always do fun little extras for special days (Valentine’s Day, Mother’s Day, etc.) that include freebies like champagne and/or roses. Nothin’ like feeling’ extra special.


  • Can Can   I finally got to try this place out for brunch last weekend and it was fantastic. During the wee morning hours of the workweek, it’s just small pastries and coffee noms, but they also have legit fancy French food at lunch, dinner, and Sunday Brunch. It’s definitely not an everyday place (pricey McPricerson for my budget), but during our brunch visit, Jer was able to find some manly-food options (potato sausage omelet), and I had both a fig-and-goat-cheese crepe and caprese cocktail that were amazing. Plus, you get free bread (who doesn’t like free?), and the cherry-almond bread is stupid good. If you like spicy, you can also give the Devil’s Bloody Mary a shot, which even Jer said was almost too spicy. I know, right?


  • The Boathouse   This bad boy has multiple locations, but I’ve only been to the one in Rocket’s Landing, which has an awesome patio space that overlooks the river. We almost always go on Thursdays for happy hour and half-off-pizza-night. My faves are the pear-pistachio and the crab-asparagus versions, but even their plain cheese is quite yummy. Plus, for $6, it’s a STEAL. If you’re feeling snazzy, lush, and 21+, I also recommend the Blood Orange Mimosa…I’m pretty sure they send someone to Florida to pick an orange direct from the tree to squeeze into my glass because it’s the BEST ORANGE JUICE EVER TO APPEAR IN A COCKTAIL. Seriously. 


  • Station 2   This is definitely dude-approved, and is Jer’s number 1 go-to spot for good beer and even better burgers, especially if we have friends from out of town that are a mixed-crowd in the gender category since the food appeals to an array of tastes. It’s an old converted firehouse on Main Street halfway between downtown and Rocket’s Landing that serves up gourmet burgers with delicious sides. Some burgers are more expected, while some are…not (peanut butter and banana burger anyone?) My favorite is the BBQ Barrista, and I almost always get their soup of the day for my side, which is unfailingly super yummy, but their salads and fried green beans also top my list if I’m feeling adventurous. The beer selection is pretty good (and always changing), and they even have “adult milkshakes” if you actually manage to have room (hah!) at the end of your meal for something extra scrumptious. (They also serve non-alchy versions for the dry folks out there, too. Half the time, I prefer the virgin versions, but it’s nice to have the happy juice option for…“those” days.)

  • Bottoms Up   Bottoms up, bottoms up. Let me fill your cup…Nope, sorry, this aint a drinkin’ place. But if you like pizza—and I mean real pizza with big puffy awesome crust, tons of cheese, and mega-amazing toppings—this place is for you. Plus, if you like trains (Sheldon Cooper anyone?), it gets bonus points because this puppy sits right under the RR tracks downtown. (Honestly, it’s always so packed you hardly even notice a 50-ton passenger train sail over you, but it’s an extra piece that makes this place different.) The pizza selection runs from simple and delicious to decadent and amaze-balls. That’s pretty much all there is to say because it’s just that good. Oh, and if you go, make sure to take note of the indicators on the wall where the owners marked the height of the river when she flooded yeeeeeears ago. I was shocked how high it was. Nuts! (Or should I say…Pizza! Too far?)

  • Weezie’s Kitchen   This is a recent discovery of ours since moving to our new apartment, and we’re smitten/obsessed/going to get fat because of this place. I only have one word for you: Mac-n-Cheese. (Is that technically two words? Or even three? I don’t know.) Honestly, I think this may be the best MNC I’ve ever had. I’ve tried other items on the menu that were good, but I’ve pretty much just come to the realization that no matter how good something else is, I always think “I should have just gotten the mac-and-cheese.” It’s heavy-duty stuff though, so watch out! The dinner-sized portion would probably feed me for 3 meals. Even as a side to something else—forget it. Too much food! Luckily, however, it comes as an a-la-cart side—Huzzah! When I go, that’s all I get. I order a $3 side of mac-n-cheese. And I can barely finish it. On Saturdays or Sundays, if we go for brunch, I also get either a mimosa or bloody Mary (both quite strong) for an additional $3. It’s the best $6 you can spend on brunch. If you’re feeling wealthy, toss in another $3 cocktail and you are good to go ‘til dinnertime. So. Good. You’re welcome.

  • Bev’s   Ok, ok, teeeechnically this is an ice cream place, but I consider ice cream/gelato/sorbet to be its own food group on the new-and-improved mLe Food Pyramid. This is a favorite of mine in the summer if I’m a good girl and save some room after hitting up Carytown Sushi (see above) since it’s about 20 feet further up the street (but let’s be real. That seldom happens because I'm a sushi-pig so I have to make a special trip at a later time instead. Oh darn.) They have many a permanent flavor, but my faves are the ever-changing rotating specials, which they post to their Facebook page daily, so you can check ahead of time if you want. If you’re lucky enough to be there on a day when the have Basil, Ginger, Pumpkin Cheesecake, or even Sweet Corn (I swear—it’s really REALLY good), feel free to do a happy dance and order a pint to-go. Their dairy-deliciousness (and non-dairy versions too!) are so good, heavy, and creamy, that I always only get a kiddie size and have plenty for my taste, but you can go all out if you prefer. Plus, they offer free samples, which I pretty much have to try one-each-of before hand just to make sure, so my belly is already on its way to satiation. And your could be too…right…now…Nom.


Okeydoke! That sums up the list-makers in the food category so far. Sorry I don't have pictures for each, but a lot of them come out dark and dreary since the lighting in most of these places is a bit on the low side. I'll update any good ones I get in the future (because you know I'm gonna go to each of these numerous times over the next few months). I'll also add any new scrumptious find we come across. Cheers to that!

What about you all? Any amazing restaurants in the RVA that you're digging lately? After writing this post I really REALLY want a sweet potato roll...


Sunday, June 17, 2012

Insert Punny Napkin Post Title Here


Try as I might, I was lacking on the post title inspiration today. So sorry.

For my brunch that I had, I decided to give some homemade napkins a go. They're cute, save on paper waste, up the ante fancy-pants-wise, and are a great excuse to learn how to sew mitered corners. In my usual thick-headed and stupid kill-as-many-birdies-with-one-stone-as-possible-even-if-every-time-you-do-it-you-say-next-time-1-new-thing-at-a-time fashion, I added on binding to that equation. I found a tutorial that said it was for beginners, so I figured "Hey...I'm a beginner!" without batting an eye...I recommend learning mitered corners, and then binding, and then combining the two together, but I digress.

The inspiration for these napkins came from this photo I came upon at the Purl Bee:


Cute right? I loved the simple main napkin with the fun border, and they just looked so pretty all together. Now, I certainly wasn't about to go and purchase a "spectrum package," so I took a different route with mismatched-but-matching patterns all tied together with the same binding. Here is what I came up with:


Now, I know that those don't look much like the inspiration napkins, so here's the story. After reading through the tutorial, I headed to Joann to see what I could find for fabric. Now, let me preface this by saying I'm cheap. Ok, got that out of the way. It just so happened that fat quarters were on sale that week, and since you can only use one coupon at a time, I decided the coupon was going toward the bias tape maker I needed to purchase for nice even binding. Some (extremely cute) high end fabric was on sale, but even at 30% off, it seemed too pricey, especially for a project that involved new sewing adventures (read: could go horribly wrong and end up with a mess of chopped up and sewing-machine-eaten fabric), so I opted to go for the fat quarters. It was more fun that way since I could choose a bunch of different fabrics! It took a while to settle on 6 I liked, but I finally narrowed them all down. Since the napkins were busy, I chose to go with plain edging, and I'm in a gray phase at the moment (especially a love for gray and white, hence the starting fabric with the modern botanic pattern that was the base for my selection), so I found a nice mid-tone gray that went with all 6 fabrics. I originally picked up matching gray thread, but later changed course and opted for a contrasting color since (again, in my dumbness), I decided to add another item to the newness list and try out a new decorative stitch for each napkin. That ended up being Ok, but seriously, I don't know why I keep doing this to myself.

Next up, I gathered my tools:


  • 1 fat quarter per napkin
  • 2 yards of fabric for the trim (the width is mostly irrelevant; by using 2 yards of fabric, you can create binding that does not need to be pieced together to go around the entirety of your napkin if you keep them to 17" square--finally used my noggin on that one)
  • 1-inch bias tape maker (or whatever you'd like your trim width to measure)
  • thread of choice
  • a measuring implement
  • a cutting implement (and mat)
  • pins (not pictured, but extremely helpful)
  • an iron for pressing the binding (possible to do without but...probably really hard)
  • a sewing machine (unless you prefer to sew by hand, in which case, feel free to show me your napkins next century--I'd love to see)

For the vast majority of this project, I referenced this tutorial by Molly at The Purl Bee, which was mentioned above. She has lots of step by step pictures. I'll keep it basic.

First up, I ironed all my fabric for easier measuring and cutting. (It's recommended to pre-wash, but I was lazy and didn't. My napkins are permanently a little rumply since washing due to uneven shrinking, but I don't mind. If you think you'll mind, toss 'em in the wash, and consider using Shout Color Catchers if mixing different colors, especially brights and whites.) Then, I cut everything to size. It took me a while to figure out that (at least my) fat quarters were not all exactly the same size, cut exactly square, etc. so be careful in your chopping. Then I cut my bias strips.

In case you don't know what measuring looks like, here is a photo for reference.


Next, I ran the strips through the little tape maker and pressed 'em as I went. I'll admit, I was a bit intimidated by that little bugger, but it's quite simple once you get the fabric through the little opening. I found that pressing as close to the opening as possible made my strips more even. So then I was left with this nice neat pile-o-napkins-waiting-to-be-born:


Up next is pinning your border to the napkins. This is where I started to hit some bumps. Pinning along the edges isn't too bad (although, it did take a little practice)...but it was pinning the corners that was hard. Molly sort of skipped right over it in her directions (probably because she can do it with her eyes closed), but I found this to be the most difficult part of the project. I'm not sure if I can offer many words of wisdom as I'm still not a pro after doing 24 of them, but feel free to share if you have any tips.


Next, it's sewin' time. Like I said, I opted for fancy-shmancy decorative stitching, which I think actually helped to cover up my still developing sewing-in-a-straight-line-skillz. However, it was a nice sampler exercise and resulted in some extra cuteness. The more intricate stitches made pivoting at the corners a bit more difficult (because of all the layers of fabric?), so they needed some yanking/prying coaxing to start down the new side, but aside from some extra thread buildup, it wasn't a horrible result. Sewing the binding together evenly at the end definitely took some practice and re-re-re-re-reading of Molly's instructions, but once you understand what to do, it's not too bad--just takes some wrapping your head around it. Promise. But consider having a cup of Pomegranate Patience on the side just in case.


So here they are all finished and ready for face-wiping. I think they came out pretty well! I think these little shark fins are my favorite. But I actually like all of them, and I purposefully matched certain stitches with certain prints by choice. I definitely recommend sewing on a scrap beforehand because there is a lot of variety within each stitch due to height and width adjustment, so make sure you get it right before you start; seam rippers are fun, but I had to use one for plenty of other mistakes on corners and binding finishing that I didn't want to have tooooo much fun. 


If binding seems (or should I say seams? har) a little intimidating, there are lots of other tutorials out there that just teach you how to finish edges with a simple mitered corner on the main piece of fabric, such as this one and this one.

I think I'm starting to get the hang of this whole sewing business. What about you all? Have any beginnerish projects you've tried or recommend? Let me at 'em!

Note: original Purl Bee image found here.


Friday, June 15, 2012

Pallet Time


It finally happened. I jumped on the pallet bandwagon.

The sad part is, I jumped on the pallet bandwagon about 3 months ago. But I got stuck on my project and set it aside for a long time until a light bulb went off in my head that said "Wow, you're dumb. Your original plan will work just fine, just get some longer screws." Der.

There are a LOT of pallet projects out there, as I'm sure many of you who read a blog like this are aware. Pallets are in vogue right now because being green and upcycling and being natural and using what you've got is all hip and cool. I consider myself to want to be all of those things, so I'm just as much of a bandwagoneer as the next guy (picture me hanging my head in moderate embarrassment, but not caring that much because it's the way I've been for a while.)

To get your little pallet-y brains churning, here are some of the bazillions of projects floating about on the Internets:

Is your bike always falling over? (That question is ten times funnier if you read it in Charlie's voice from It's Always Sunny regarding his "kitten mittens.") Do you enjoy wedging tires into vertical slots? Try this bike rack on for size:


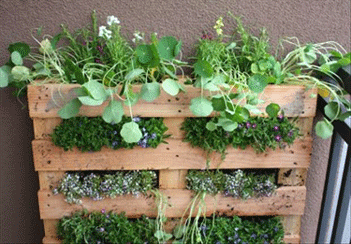
Like plants? Kill them when you grow them inside? Want something that requires zero work except smooshing soil, potting mix, and your plants of choice in between some slats? Give this super simple pallet garden a go:


Prefer to at least look like you did a little DIY action? Use little planters and some plumbing rings for some industrial-natural awesomeness:


Want to bring the pallet love inside? Spruce it up with some bright paint, throw on some casters, and you've got yourself a brand new coffee table:


Like pallets so much you want to make sure they can hear your heart beating while you sleep? Consider whipping up a pallet headboard:


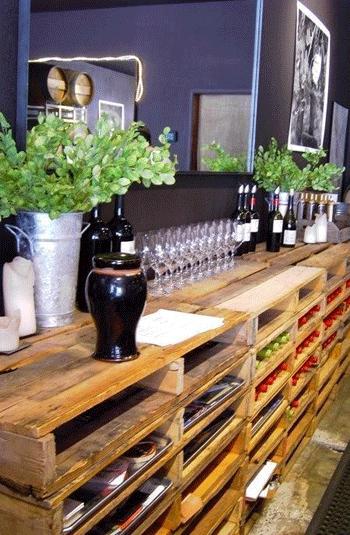
And this may be my all-time fave. Hopefully something similar will be incorporated into my *fingers crossed* not-so-distant-future-new-apartment-studio-space-that-will-not-be-shared-and-will-be-all-mine. How awesome would this be with some plexi-glass for a smooth work surface? It looks awesome and has a ridiculous amount of storage naturally built in. And for $free.99, I don't think you can beat the price (assuming you find someone nice to fork over some pallets free-o-charge):


So, after some perusing, I decided I wanted to get in on the pallet action, but with something I hadn't seen before. I knew I would probably use the whole pallet because I was hoping to use it as some space filler/art over the couch in our living room since that wall is about 1.5 stories high since it stretches half-way into the loft to create a bannister. Basically, we had a 14 foot fall of nothingness to fill. And I wanted something big.

I also wanted a clock.

So what do you get when you put those two things together? Wait for it...a pallet clock. Original right?


Actually, I think it's pretty cool. I picked up a wall clock kit at Hobby Lobby with a 40% off coup for about $18 to get things started (it comes with vinyl number decals to actually create a clock face, but I bailed on those; I grew up with a number-less clock above my kitchen table and don't mind clocks sans numbers). I decided to up the contrast of the pallet against the wall, so I threw some stain on after a good sanding. Because there are an even number of slats on this particular pallet, I needed something to anchor my clock to in the center, so I picked up a wooden disk (again from HL) for about $1. A couple of screws later, and she was ready to clock rock.

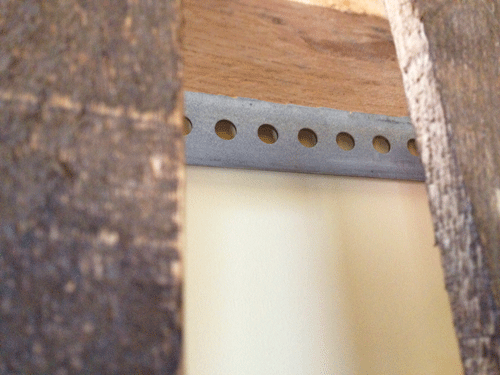
The major snafu I ran into was how to get this baby on the wall. I'm not sure if you've ever picked up a pallet before, but I was suuuuper surprised to feel how heavy this thing was. I'd say at least 25 ell-bees if not more. Clearly, it had to be anchored into some studs, 3 being ideal for the ultimate safety-factor considering I didn't want to spend the rest of my time in my apartment perched on the edge of my couch waiting for a pallet to rip out of the wall and squash me. But how to do this? There are big negative spaces between the "front" and "back" boards of a pallet making screwing through the front into the wall impossible...but the slat spacing of the "front" boards makes it impossible to reach around/through and drill through the "back" pieces directly into the wall. So I used my noggin and picked up one of these steel hoozi-whats-its from Lowe's for around 5 bones. I figured it was perfect since it came with tons of evenly spaced holes all ready for hanging that could easily line up with any stud distances because there's a hole every 1/2 inch or so:


Here is where I hit the snageroo. A 3-foot bar was about 2 inches short to reach cleanly from side to side to be anchored on the same horizontal plane. But a 4 footer stuck way out on the sides and looked super lame. No one at Lowe's or Home Depot could cut it for me and I certainly don't have the tools or know-how to do it myself. So I half-heartedly looked around for varying sizes but knew it was no use. I chalked it up as a fail and pretended there wasn't a pallet leaning against my dining room table in my living room for 3 months.

And then I realized I was really dumb. Like...really super duper ultra dumb. With 2-inch screws, I could easily span the negative space on the back of the pallet to make sure the steel bar still fell even across the entire back. I would illustrate this with a photo if I had thought to snap one in my excitement for overcoming my stupidity and hurriedly finishing the project and getting this thing on the wall. Womp womp. My bad.

Long story short, after screwing the bar to the pallet, marking my studs, and putting some nice 2-inch anchor screws in the wall, this project was up on the wall in no time thanks to the ease of hanging because of the numerous holes in the steel rod. They just slipped right over the screw heads. It was glorious.


Anyone else come up with some original pallet art? Link to it in the comments below--I'd love to see!


Note: External pallet project images found here, here, here, here, here, and here.


Monday, May 28, 2012

Brunch Invitations


I love the idea of brunch. I pin images on Pinterest related to brunch like it's my job. Brunch is the perfect combo of breakfast foods (fav meal of the day), dessert food (favorite non-officially-recognized meal of the day), and girlie drinks. Honestly, what's not to like about brunch?

So as my internship dies down, I was trying to come up with a way to thank the people who have helped me the most this year. I've worked with such an amazing group of people who have all helped me mature and better understand not only my profession, but also the world of education and the realities that come along with it. I wanted to thank the people who made the biggest mark on my year, and wanted to do it in a way that was fun, meaningful, genuine, and "very mLe." After throwing around a bunch of ideas with the bf, I settled on a small Sunday brunch. And how could you have a girlie brunch without invitations?

I had been dying to use some new stamps I got for Christmas, but hadn't found a way to tie into cards since one of the sets I had asked for was very "scrapbooky" and didn't lend itself well to cards. After beeboppin' around on P-ville for a while, I found a few invitations that had the overall look and feel I was going for and then went with it from there. This image was the one I liked the most that helped me design the final product:


I wanted to try and stamp out the flowers myself using different shades of ink and different "petal" sizes, but unfortunately, the craft paper I was using soaked it up far too much for the effect that I was going for. So I decided to take the leap and make a --GASP--hybrid project.

I have never made a hybrid project before. It's either been all by hand or all digital--one or the other. No mixies. But I actually really like the way they came out! The flower leaves, large text, and heavy horizontal lines are digital. The rest is stamped or handwritten.


After making the original invitation (the craft paper part), I decided to draw up some directions since navigating in and around my building can be difficult and kind of confusing. I simply slit a line at the bottom of the invitation and slipped the bottom of the directions sheet through and then let the baker's twine hold the upper portion in place. It's not super sturdy, but I'm not exactly planning on using these to support my weight while skydiving. I liked the 3-dimensional idea so much that I went back in with my craft knife and raised up the flower leaves for more dimension and texture. It only took about a minute per invitation and I think it added a really nice final touch!


I'm finalizing the menu and definitely utilizing Pinterest to help me. I'll share ideas as I go!

The stamps I used are from Ali Edwards "Today You" set, and the large vellum flower is from Hero Arts. The butterfly punch is Martha Stewart.

What about you guys...are you as enamored of brunch as I am? Sigh. I love brunch.

Note: Gray/Black invitation image found here.


Wednesday, May 23, 2012

Stripper Smack Down


No no, not that kind of stripper. Sheesh. Paint stripper. I've been meaning to blog about this for a while but I lost the photos and finally located (most of) them today. Last summer, sitting next to a trash can on garbage night awaiting doom at the dump, I spied a furniture piece friend in need of some help. Not wanting to be totally creepy, I didn't take a photo, but rather sent my boyfriend to fetch it after dark. Not creepy at all. She came with some black knob hardware that was in pretty decent shape, but I forgot to snag a pic before beginning plastic surgery. So here she is partially naked and ready to begin her transformation:


Being extremely paranoid about bugs and critters, I wiped the entire thing down twice with antibacterial wipes and a strong bathroom antibac spray before even allowing her on the patio. Upon getting a good look at her, I was pleasantly surprised that the dresser was all wood, and though it had a LOT of layers of paint on it, was in pretty good shape. I wasn't feeling the off-white vibe, and since she was all wood, I decided to strip 'er down to see see the grain hiding underneath her layers of color (as it turned out, there were a LOT). I was hoping to end up with something like this gorgeous lovely from Kate over at Centsational Girl.

Being the semi-green person that I am, and hearing good things from Centsational Girl about Citristrip, I decided to be nice to the earth (and my lungs), and strip the paint the green way. (Excuse the blurry photos; my poor little point and shoot was on death's door at this point. She's since gone to camera heaven. May she shoot in peace).


I laid out all the drawers on a big ol' piece of cardboard to catch any drippings, etc. Note: a 3 inch border is SO not enough to accomplish this. If you try this yourself, go big or go home. Trust me. It beats trying to scrape up stripper drippings off of concrete so you don't get charged/chewed out by your landlord.


So I painted on a nice thick layer of orange goop (aka: Citristrip) and let it sit for the recommended amount of time. After 30 minutes, I had this.


Once again, excuse the awful pics. If you could see what was going on there, you'd notice that there was very minimal bubbling. I had never stripped anything before, so wasn't sure if that was normal. So I gave it another 15 minutes. Then I had this:


That seemed like an improvement. Thinking that was what I was looking for, I gave it a scrape. (Spoiler alert: that is SO not enough bubbling). After scraping off maybe 10% of a single layer of paint and 100% of the stripper, I was left with a pile of orange goop in my tin and whole heck of a lot of paint still stuck on my dresser. Fail.

I figured it was time to chalk that one up as a failure (both earth-wise and financial-wise), and go for the old school hard-core nasty-bad-for-you-and-the-earth stripper. I'm not sure if it was the kind of paint that was used that was the culprit for the lack of effect; judging by the impact Citristrip had on the above-linked project at Centsational Girl, it may have been since hers was clearly latex paint and peeled off in a nice clean sweep. And mine...well...didn't. Enter chemical-ville stage right:


Take 2:


After only 5 minutes, this bubble party was goin' on.


And after another 20, she was ready to rock.


Time to scrape. Now, I am not wearing gloves in this photo. Nor did I test for lead paint, so...don't do it my way. However, I DID wear a mask, and since there was no dust (I was stripping, not sanding), I wasn't too worried. However, not wearing gloves was a bad idea and I don't recommend it. I got chemical burns all over my hands and forearms and they HURT. You don't notice when you get it on you, and then all of a sudden  you think, "Hmm...my arm hurts. What is that? Ow! OWWWW!!" Then you look down and see a tiny little dot of something on your arm and think, "Was I stung? OW! OWW!!! WTF??" Then you swipe your hand over your arm, and it helps a little bit, but then your hand starts to burn and your arm continues to get worse. After that, you run around your patio like an idiot looking for something to wipe all your skin on, such as a large tarp, grass, or nearby garbage bag. Just sayin'. Wear gloves. And not the latex ones--they don't work for this business. You actually need the chemical hazardous ones. Not that I know from experience or anything...


Ok, so back to stripping. Paint. Stripping paint. This tool is handy because of all of its shapes and nooks for getting multiple surface types. It's like a torch of awesome.


For easy paint removal/picking uppage, I just placed my bin at the end and sloughed my pile of goo right off the end and into the bucket. You should really use a metal receptacle, as the stripper can burn through plastic over time, but I had used mine with the lame-o Citristrip and knew I'd need another one later to denature the stripper.


After round 1, I hadn't reached wood. So I did another...and I uncovered this little gem. There was a different poodle on each drawer, some kind of decal. Cute but...not really. Interesting, but off it went.


After the last round, I was left with this. It wasn't perfect, but it was a major improvement and I decided to sand the rest off.


Before sanding, I wanted to deactivate the stripper so that I could handle the piece without that God-awful burning. So I grabbed some odorless turpenoid and a stripper scrubby (that worked GREAT by the way) and gave her a good rub down. It caught some little stripped bits here and there that I missed with the smooth scraper. Plus she was neutralized and ready to go!


This is where I would show you the after of her all cleaned up and ready. I KNOW I took those pictures, but I can't find them for the life of me...they should be with all the others one taken at the same time. My computer must have gotten hungry and eaten them. It's too bad, because the wood grain was quite pretty...although that's a bit of a giveaway for the fact that she ended up NOT stained or I'd take a pic right now. Oh man, are you totally on the edge of your seat? I know you are. Don't lie.


Sunday, April 22, 2012

A Video Review: The Pippa


I have certainly never done a video review before, but I decided to give it a go. This video is pretty long (about 19 minutes), as I haven't gotten to the point to learn what to cut out and what to leave in (it's much easier when it comes to written stuff...but I've had a lot of practice doing that, so hopefully this will get easier over time). I'm still learning the ropes of iMovie as I go, but I think I managed to come up with something that can answer peoples' questions about the Pippa!

It's a little nerve-wracking to purchase something that's $250 without getting to see, touch, and hold it in person first. I found a few reviews, both written and video, that were helpful, but they didn't really gather everything into one place. So I decided to have a go at a Vlog review! Like I say on my fashion page, and like I said above, I'm no fashionista and I'm certainly not a video-editing pro. But it was fun, and I'd love to hear feedback on what things to cut out, what people like, etc.

I do have one disclaimer: my lovely Canon Vixia HFR10 is a great camera, shoots awesome footage (especially in daylight), and is very user friendly for a beginner videographer (if you can call me that) like myself. However, the internal microphone picks up a subtle clicking noise within the camera that I have since learned is the auto focus. So excuse the clickity-clack chatter in the background, but sadly I have no external mic which is the only remedy I have come across!

Since the video is a bit long, here is a general breakdown of certain parts so you can skip to certain sections if you'd like!


  • Intro and Background: 0:00
  • Purchasing the Pippa in North America and the "Database": 1:25
  • Packaging: 3:05
  • Pricing: 4:10
  • General Overview and Description: 6:15
  • Sizing Comparisons: 11:05
  • Leather (Color, Feel, and Texture): 13:00
  • Some Nice Details: 14:25
  • Carrying and Storage Options: 15:20
  • Closing: 18:25


As a second caveat...after embedding this in my blog, I have no idea what on earth YouTube did to the lighting in my video; before and after each scene it gets really dark. That's certainly not showing in my editing on iMovie--sorry for the techno effects! Live and learn!

If you have any specific questions about the bag, I'd be more than happy to help if I can--feel free to leave a comment :)