Sunday, October 28, 2012

RVAdventurer!


Oh, snap! It's time for the first RVAdventurer post ever.

So what is RVAdventurer? (Note: RVAdventurer is not to be confused with RV Adventurer, which is about peeps doin' it up traveling around the good ol' US of A in their RVs...which is cool I guess, but not the same thing. At all.) RVAdventurer is a place for me to document my life in Richmond, VA, or "RVA" for those in the know. If you're a local, you probably recognize my logo, which is a pimped up mLeinked version of those bumper stickers that are EVERYWHERE in this city. My boyfriend and I finally got our mitts on our very own personal copies, so our cars are now the proud bumper-displayers of stickers of their very own. We've been trying to get these stickers for months and finally came across them at the Folk Festival. Woot. And that's what got the gears turning for RVAdventurer.

Jer and I have lived in Richmond for just over a year, although the first 12 months only half count because we were too scared to leave our apartment building half the time to enjoy life in the River City. However, after moving to the coveted Fan/Carytown/Museum District area about 2 months ago, we are ten bazillion times happier (and safer), and are finally seeing what it's like to be able to walk to a market, bar, festival, or restaurant without worrying about getting shot or mugged for the better 99.99999% of the commute. Woot.

But since we've lived here for a bit, we've discovered some sweet noms, green spaces, awesome annual events, and just unique aspects of Richmond that we love. So while I'll share new things that we find as we go, I figured I'd share what we've already come to love and look forward to in good ol' RVA. After making a mega list that grew and grew, I finally decided to break it down into some categories, including where to eat, shop, play, drink, and visit. And if you know me even a smidgen bit, you know where I'm going to start: with the grub. These aren't exactly listed in any specific order, but they are vaguely reminiscent of the order of my super-all-time-faves to my pretty-sweet-faves, as they're mostly in the order that they came to mind. So without further ado.

RVAdventurer: Where to Eat

  • Carytown Sushi   Oh Carytown Sushi, how do I love thee? Let me count the ways…amazing tea…cozy atmosphere…super cute pink-octopus-drawn-on-the-chalkboard…mini Connect-Fours on the tables…oh, and half-off (most) sushi on Tuesdays and Wednesdays from 5-7. Yes. Half. Everything is delicious, but the more unique rolls I like that I don’t think I’ve seen elsewhere are the seaweed salad roll and the sweet potato roll. So. So. Good. And affordable. Even Jeremy approves! (On a side note, all the wait staff know him as “5-Cucumber-Rolls-Please guy.” He gets that almost almost every week. One time he got 4 cucumber rolls and a carrot roll and I thought the waitress was going to die of shock. However, I encourage being a bit more adventurous because everything is awesome!)

  • Selba   This isn’t particularly dude-friendly, but this is my number one go-to spot when I have girl friends come to town. The portions are on the small side, but I haven’t eaten anything that caused me to say “Man, I wish I had gotten something else…” and I’ve tried a LOT. They have a pretty big selection of vegetarian and vegan options, plus some really interesting cocktails. I believe it’s characterized as “new American” food, but I think of it as just “really really awesomely good food.” If you like seafood, the scallops are ree-donk-u-lous. Plus, they always do fun little extras for special days (Valentine’s Day, Mother’s Day, etc.) that include freebies like champagne and/or roses. Nothin’ like feeling’ extra special.


  • Can Can   I finally got to try this place out for brunch last weekend and it was fantastic. During the wee morning hours of the workweek, it’s just small pastries and coffee noms, but they also have legit fancy French food at lunch, dinner, and Sunday Brunch. It’s definitely not an everyday place (pricey McPricerson for my budget), but during our brunch visit, Jer was able to find some manly-food options (potato sausage omelet), and I had both a fig-and-goat-cheese crepe and caprese cocktail that were amazing. Plus, you get free bread (who doesn’t like free?), and the cherry-almond bread is stupid good. If you like spicy, you can also give the Devil’s Bloody Mary a shot, which even Jer said was almost too spicy. I know, right?


  • The Boathouse   This bad boy has multiple locations, but I’ve only been to the one in Rocket’s Landing, which has an awesome patio space that overlooks the river. We almost always go on Thursdays for happy hour and half-off-pizza-night. My faves are the pear-pistachio and the crab-asparagus versions, but even their plain cheese is quite yummy. Plus, for $6, it’s a STEAL. If you’re feeling snazzy, lush, and 21+, I also recommend the Blood Orange Mimosa…I’m pretty sure they send someone to Florida to pick an orange direct from the tree to squeeze into my glass because it’s the BEST ORANGE JUICE EVER TO APPEAR IN A COCKTAIL. Seriously. 


  • Station 2   This is definitely dude-approved, and is Jer’s number 1 go-to spot for good beer and even better burgers, especially if we have friends from out of town that are a mixed-crowd in the gender category since the food appeals to an array of tastes. It’s an old converted firehouse on Main Street halfway between downtown and Rocket’s Landing that serves up gourmet burgers with delicious sides. Some burgers are more expected, while some are…not (peanut butter and banana burger anyone?) My favorite is the BBQ Barrista, and I almost always get their soup of the day for my side, which is unfailingly super yummy, but their salads and fried green beans also top my list if I’m feeling adventurous. The beer selection is pretty good (and always changing), and they even have “adult milkshakes” if you actually manage to have room (hah!) at the end of your meal for something extra scrumptious. (They also serve non-alchy versions for the dry folks out there, too. Half the time, I prefer the virgin versions, but it’s nice to have the happy juice option for…“those” days.)

  • Bottoms Up   Bottoms up, bottoms up. Let me fill your cup…Nope, sorry, this aint a drinkin’ place. But if you like pizza—and I mean real pizza with big puffy awesome crust, tons of cheese, and mega-amazing toppings—this place is for you. Plus, if you like trains (Sheldon Cooper anyone?), it gets bonus points because this puppy sits right under the RR tracks downtown. (Honestly, it’s always so packed you hardly even notice a 50-ton passenger train sail over you, but it’s an extra piece that makes this place different.) The pizza selection runs from simple and delicious to decadent and amaze-balls. That’s pretty much all there is to say because it’s just that good. Oh, and if you go, make sure to take note of the indicators on the wall where the owners marked the height of the river when she flooded yeeeeeears ago. I was shocked how high it was. Nuts! (Or should I say…Pizza! Too far?)

  • Weezie’s Kitchen   This is a recent discovery of ours since moving to our new apartment, and we’re smitten/obsessed/going to get fat because of this place. I only have one word for you: Mac-n-Cheese. (Is that technically two words? Or even three? I don’t know.) Honestly, I think this may be the best MNC I’ve ever had. I’ve tried other items on the menu that were good, but I’ve pretty much just come to the realization that no matter how good something else is, I always think “I should have just gotten the mac-and-cheese.” It’s heavy-duty stuff though, so watch out! The dinner-sized portion would probably feed me for 3 meals. Even as a side to something else—forget it. Too much food! Luckily, however, it comes as an a-la-cart side—Huzzah! When I go, that’s all I get. I order a $3 side of mac-n-cheese. And I can barely finish it. On Saturdays or Sundays, if we go for brunch, I also get either a mimosa or bloody Mary (both quite strong) for an additional $3. It’s the best $6 you can spend on brunch. If you’re feeling wealthy, toss in another $3 cocktail and you are good to go ‘til dinnertime. So. Good. You’re welcome.

  • Bev’s   Ok, ok, teeeechnically this is an ice cream place, but I consider ice cream/gelato/sorbet to be its own food group on the new-and-improved mLe Food Pyramid. This is a favorite of mine in the summer if I’m a good girl and save some room after hitting up Carytown Sushi (see above) since it’s about 20 feet further up the street (but let’s be real. That seldom happens because I'm a sushi-pig so I have to make a special trip at a later time instead. Oh darn.) They have many a permanent flavor, but my faves are the ever-changing rotating specials, which they post to their Facebook page daily, so you can check ahead of time if you want. If you’re lucky enough to be there on a day when the have Basil, Ginger, Pumpkin Cheesecake, or even Sweet Corn (I swear—it’s really REALLY good), feel free to do a happy dance and order a pint to-go. Their dairy-deliciousness (and non-dairy versions too!) are so good, heavy, and creamy, that I always only get a kiddie size and have plenty for my taste, but you can go all out if you prefer. Plus, they offer free samples, which I pretty much have to try one-each-of before hand just to make sure, so my belly is already on its way to satiation. And your could be too…right…now…Nom.


Okeydoke! That sums up the list-makers in the food category so far. Sorry I don't have pictures for each, but a lot of them come out dark and dreary since the lighting in most of these places is a bit on the low side. I'll update any good ones I get in the future (because you know I'm gonna go to each of these numerous times over the next few months). I'll also add any new scrumptious find we come across. Cheers to that!

What about you all? Any amazing restaurants in the RVA that you're digging lately? After writing this post I really REALLY want a sweet potato roll...


Sunday, June 17, 2012

Insert Punny Napkin Post Title Here


Try as I might, I was lacking on the post title inspiration today. So sorry.

For my brunch that I had, I decided to give some homemade napkins a go. They're cute, save on paper waste, up the ante fancy-pants-wise, and are a great excuse to learn how to sew mitered corners. In my usual thick-headed and stupid kill-as-many-birdies-with-one-stone-as-possible-even-if-every-time-you-do-it-you-say-next-time-1-new-thing-at-a-time fashion, I added on binding to that equation. I found a tutorial that said it was for beginners, so I figured "Hey...I'm a beginner!" without batting an eye...I recommend learning mitered corners, and then binding, and then combining the two together, but I digress.

The inspiration for these napkins came from this photo I came upon at the Purl Bee:


Cute right? I loved the simple main napkin with the fun border, and they just looked so pretty all together. Now, I certainly wasn't about to go and purchase a "spectrum package," so I took a different route with mismatched-but-matching patterns all tied together with the same binding. Here is what I came up with:


Now, I know that those don't look much like the inspiration napkins, so here's the story. After reading through the tutorial, I headed to Joann to see what I could find for fabric. Now, let me preface this by saying I'm cheap. Ok, got that out of the way. It just so happened that fat quarters were on sale that week, and since you can only use one coupon at a time, I decided the coupon was going toward the bias tape maker I needed to purchase for nice even binding. Some (extremely cute) high end fabric was on sale, but even at 30% off, it seemed too pricey, especially for a project that involved new sewing adventures (read: could go horribly wrong and end up with a mess of chopped up and sewing-machine-eaten fabric), so I opted to go for the fat quarters. It was more fun that way since I could choose a bunch of different fabrics! It took a while to settle on 6 I liked, but I finally narrowed them all down. Since the napkins were busy, I chose to go with plain edging, and I'm in a gray phase at the moment (especially a love for gray and white, hence the starting fabric with the modern botanic pattern that was the base for my selection), so I found a nice mid-tone gray that went with all 6 fabrics. I originally picked up matching gray thread, but later changed course and opted for a contrasting color since (again, in my dumbness), I decided to add another item to the newness list and try out a new decorative stitch for each napkin. That ended up being Ok, but seriously, I don't know why I keep doing this to myself.

Next up, I gathered my tools:


  • 1 fat quarter per napkin
  • 2 yards of fabric for the trim (the width is mostly irrelevant; by using 2 yards of fabric, you can create binding that does not need to be pieced together to go around the entirety of your napkin if you keep them to 17" square--finally used my noggin on that one)
  • 1-inch bias tape maker (or whatever you'd like your trim width to measure)
  • thread of choice
  • a measuring implement
  • a cutting implement (and mat)
  • pins (not pictured, but extremely helpful)
  • an iron for pressing the binding (possible to do without but...probably really hard)
  • a sewing machine (unless you prefer to sew by hand, in which case, feel free to show me your napkins next century--I'd love to see)

For the vast majority of this project, I referenced this tutorial by Molly at The Purl Bee, which was mentioned above. She has lots of step by step pictures. I'll keep it basic.

First up, I ironed all my fabric for easier measuring and cutting. (It's recommended to pre-wash, but I was lazy and didn't. My napkins are permanently a little rumply since washing due to uneven shrinking, but I don't mind. If you think you'll mind, toss 'em in the wash, and consider using Shout Color Catchers if mixing different colors, especially brights and whites.) Then, I cut everything to size. It took me a while to figure out that (at least my) fat quarters were not all exactly the same size, cut exactly square, etc. so be careful in your chopping. Then I cut my bias strips.

In case you don't know what measuring looks like, here is a photo for reference.


Next, I ran the strips through the little tape maker and pressed 'em as I went. I'll admit, I was a bit intimidated by that little bugger, but it's quite simple once you get the fabric through the little opening. I found that pressing as close to the opening as possible made my strips more even. So then I was left with this nice neat pile-o-napkins-waiting-to-be-born:


Up next is pinning your border to the napkins. This is where I started to hit some bumps. Pinning along the edges isn't too bad (although, it did take a little practice)...but it was pinning the corners that was hard. Molly sort of skipped right over it in her directions (probably because she can do it with her eyes closed), but I found this to be the most difficult part of the project. I'm not sure if I can offer many words of wisdom as I'm still not a pro after doing 24 of them, but feel free to share if you have any tips.


Next, it's sewin' time. Like I said, I opted for fancy-shmancy decorative stitching, which I think actually helped to cover up my still developing sewing-in-a-straight-line-skillz. However, it was a nice sampler exercise and resulted in some extra cuteness. The more intricate stitches made pivoting at the corners a bit more difficult (because of all the layers of fabric?), so they needed some yanking/prying coaxing to start down the new side, but aside from some extra thread buildup, it wasn't a horrible result. Sewing the binding together evenly at the end definitely took some practice and re-re-re-re-reading of Molly's instructions, but once you understand what to do, it's not too bad--just takes some wrapping your head around it. Promise. But consider having a cup of Pomegranate Patience on the side just in case.


So here they are all finished and ready for face-wiping. I think they came out pretty well! I think these little shark fins are my favorite. But I actually like all of them, and I purposefully matched certain stitches with certain prints by choice. I definitely recommend sewing on a scrap beforehand because there is a lot of variety within each stitch due to height and width adjustment, so make sure you get it right before you start; seam rippers are fun, but I had to use one for plenty of other mistakes on corners and binding finishing that I didn't want to have tooooo much fun. 


If binding seems (or should I say seams? har) a little intimidating, there are lots of other tutorials out there that just teach you how to finish edges with a simple mitered corner on the main piece of fabric, such as this one and this one.

I think I'm starting to get the hang of this whole sewing business. What about you all? Have any beginnerish projects you've tried or recommend? Let me at 'em!

Note: original Purl Bee image found here.


Friday, June 15, 2012

Pallet Time


It finally happened. I jumped on the pallet bandwagon.

The sad part is, I jumped on the pallet bandwagon about 3 months ago. But I got stuck on my project and set it aside for a long time until a light bulb went off in my head that said "Wow, you're dumb. Your original plan will work just fine, just get some longer screws." Der.

There are a LOT of pallet projects out there, as I'm sure many of you who read a blog like this are aware. Pallets are in vogue right now because being green and upcycling and being natural and using what you've got is all hip and cool. I consider myself to want to be all of those things, so I'm just as much of a bandwagoneer as the next guy (picture me hanging my head in moderate embarrassment, but not caring that much because it's the way I've been for a while.)

To get your little pallet-y brains churning, here are some of the bazillions of projects floating about on the Internets:

Is your bike always falling over? (That question is ten times funnier if you read it in Charlie's voice from It's Always Sunny regarding his "kitten mittens.") Do you enjoy wedging tires into vertical slots? Try this bike rack on for size:


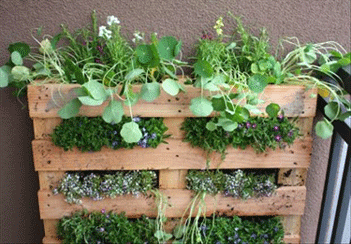
Like plants? Kill them when you grow them inside? Want something that requires zero work except smooshing soil, potting mix, and your plants of choice in between some slats? Give this super simple pallet garden a go:


Prefer to at least look like you did a little DIY action? Use little planters and some plumbing rings for some industrial-natural awesomeness:


Want to bring the pallet love inside? Spruce it up with some bright paint, throw on some casters, and you've got yourself a brand new coffee table:


Like pallets so much you want to make sure they can hear your heart beating while you sleep? Consider whipping up a pallet headboard:


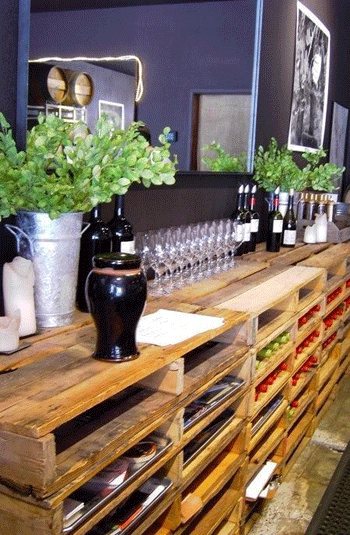
And this may be my all-time fave. Hopefully something similar will be incorporated into my *fingers crossed* not-so-distant-future-new-apartment-studio-space-that-will-not-be-shared-and-will-be-all-mine. How awesome would this be with some plexi-glass for a smooth work surface? It looks awesome and has a ridiculous amount of storage naturally built in. And for $free.99, I don't think you can beat the price (assuming you find someone nice to fork over some pallets free-o-charge):


So, after some perusing, I decided I wanted to get in on the pallet action, but with something I hadn't seen before. I knew I would probably use the whole pallet because I was hoping to use it as some space filler/art over the couch in our living room since that wall is about 1.5 stories high since it stretches half-way into the loft to create a bannister. Basically, we had a 14 foot fall of nothingness to fill. And I wanted something big.

I also wanted a clock.

So what do you get when you put those two things together? Wait for it...a pallet clock. Original right?


Actually, I think it's pretty cool. I picked up a wall clock kit at Hobby Lobby with a 40% off coup for about $18 to get things started (it comes with vinyl number decals to actually create a clock face, but I bailed on those; I grew up with a number-less clock above my kitchen table and don't mind clocks sans numbers). I decided to up the contrast of the pallet against the wall, so I threw some stain on after a good sanding. Because there are an even number of slats on this particular pallet, I needed something to anchor my clock to in the center, so I picked up a wooden disk (again from HL) for about $1. A couple of screws later, and she was ready to clock rock.

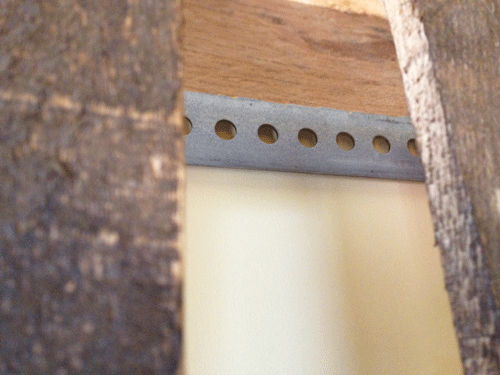
The major snafu I ran into was how to get this baby on the wall. I'm not sure if you've ever picked up a pallet before, but I was suuuuper surprised to feel how heavy this thing was. I'd say at least 25 ell-bees if not more. Clearly, it had to be anchored into some studs, 3 being ideal for the ultimate safety-factor considering I didn't want to spend the rest of my time in my apartment perched on the edge of my couch waiting for a pallet to rip out of the wall and squash me. But how to do this? There are big negative spaces between the "front" and "back" boards of a pallet making screwing through the front into the wall impossible...but the slat spacing of the "front" boards makes it impossible to reach around/through and drill through the "back" pieces directly into the wall. So I used my noggin and picked up one of these steel hoozi-whats-its from Lowe's for around 5 bones. I figured it was perfect since it came with tons of evenly spaced holes all ready for hanging that could easily line up with any stud distances because there's a hole every 1/2 inch or so:


Here is where I hit the snageroo. A 3-foot bar was about 2 inches short to reach cleanly from side to side to be anchored on the same horizontal plane. But a 4 footer stuck way out on the sides and looked super lame. No one at Lowe's or Home Depot could cut it for me and I certainly don't have the tools or know-how to do it myself. So I half-heartedly looked around for varying sizes but knew it was no use. I chalked it up as a fail and pretended there wasn't a pallet leaning against my dining room table in my living room for 3 months.

And then I realized I was really dumb. Like...really super duper ultra dumb. With 2-inch screws, I could easily span the negative space on the back of the pallet to make sure the steel bar still fell even across the entire back. I would illustrate this with a photo if I had thought to snap one in my excitement for overcoming my stupidity and hurriedly finishing the project and getting this thing on the wall. Womp womp. My bad.

Long story short, after screwing the bar to the pallet, marking my studs, and putting some nice 2-inch anchor screws in the wall, this project was up on the wall in no time thanks to the ease of hanging because of the numerous holes in the steel rod. They just slipped right over the screw heads. It was glorious.


Anyone else come up with some original pallet art? Link to it in the comments below--I'd love to see!


Note: External pallet project images found here, here, here, here, here, and here.


Monday, May 28, 2012

Brunch Invitations


I love the idea of brunch. I pin images on Pinterest related to brunch like it's my job. Brunch is the perfect combo of breakfast foods (fav meal of the day), dessert food (favorite non-officially-recognized meal of the day), and girlie drinks. Honestly, what's not to like about brunch?

So as my internship dies down, I was trying to come up with a way to thank the people who have helped me the most this year. I've worked with such an amazing group of people who have all helped me mature and better understand not only my profession, but also the world of education and the realities that come along with it. I wanted to thank the people who made the biggest mark on my year, and wanted to do it in a way that was fun, meaningful, genuine, and "very mLe." After throwing around a bunch of ideas with the bf, I settled on a small Sunday brunch. And how could you have a girlie brunch without invitations?

I had been dying to use some new stamps I got for Christmas, but hadn't found a way to tie into cards since one of the sets I had asked for was very "scrapbooky" and didn't lend itself well to cards. After beeboppin' around on P-ville for a while, I found a few invitations that had the overall look and feel I was going for and then went with it from there. This image was the one I liked the most that helped me design the final product:


I wanted to try and stamp out the flowers myself using different shades of ink and different "petal" sizes, but unfortunately, the craft paper I was using soaked it up far too much for the effect that I was going for. So I decided to take the leap and make a --GASP--hybrid project.

I have never made a hybrid project before. It's either been all by hand or all digital--one or the other. No mixies. But I actually really like the way they came out! The flower leaves, large text, and heavy horizontal lines are digital. The rest is stamped or handwritten.


After making the original invitation (the craft paper part), I decided to draw up some directions since navigating in and around my building can be difficult and kind of confusing. I simply slit a line at the bottom of the invitation and slipped the bottom of the directions sheet through and then let the baker's twine hold the upper portion in place. It's not super sturdy, but I'm not exactly planning on using these to support my weight while skydiving. I liked the 3-dimensional idea so much that I went back in with my craft knife and raised up the flower leaves for more dimension and texture. It only took about a minute per invitation and I think it added a really nice final touch!


I'm finalizing the menu and definitely utilizing Pinterest to help me. I'll share ideas as I go!

The stamps I used are from Ali Edwards "Today You" set, and the large vellum flower is from Hero Arts. The butterfly punch is Martha Stewart.

What about you guys...are you as enamored of brunch as I am? Sigh. I love brunch.

Note: Gray/Black invitation image found here.


Wednesday, May 23, 2012

Stripper Smack Down


No no, not that kind of stripper. Sheesh. Paint stripper. I've been meaning to blog about this for a while but I lost the photos and finally located (most of) them today. Last summer, sitting next to a trash can on garbage night awaiting doom at the dump, I spied a furniture piece friend in need of some help. Not wanting to be totally creepy, I didn't take a photo, but rather sent my boyfriend to fetch it after dark. Not creepy at all. She came with some black knob hardware that was in pretty decent shape, but I forgot to snag a pic before beginning plastic surgery. So here she is partially naked and ready to begin her transformation:


Being extremely paranoid about bugs and critters, I wiped the entire thing down twice with antibacterial wipes and a strong bathroom antibac spray before even allowing her on the patio. Upon getting a good look at her, I was pleasantly surprised that the dresser was all wood, and though it had a LOT of layers of paint on it, was in pretty good shape. I wasn't feeling the off-white vibe, and since she was all wood, I decided to strip 'er down to see see the grain hiding underneath her layers of color (as it turned out, there were a LOT). I was hoping to end up with something like this gorgeous lovely from Kate over at Centsational Girl.

Being the semi-green person that I am, and hearing good things from Centsational Girl about Citristrip, I decided to be nice to the earth (and my lungs), and strip the paint the green way. (Excuse the blurry photos; my poor little point and shoot was on death's door at this point. She's since gone to camera heaven. May she shoot in peace).


I laid out all the drawers on a big ol' piece of cardboard to catch any drippings, etc. Note: a 3 inch border is SO not enough to accomplish this. If you try this yourself, go big or go home. Trust me. It beats trying to scrape up stripper drippings off of concrete so you don't get charged/chewed out by your landlord.


So I painted on a nice thick layer of orange goop (aka: Citristrip) and let it sit for the recommended amount of time. After 30 minutes, I had this.


Once again, excuse the awful pics. If you could see what was going on there, you'd notice that there was very minimal bubbling. I had never stripped anything before, so wasn't sure if that was normal. So I gave it another 15 minutes. Then I had this:


That seemed like an improvement. Thinking that was what I was looking for, I gave it a scrape. (Spoiler alert: that is SO not enough bubbling). After scraping off maybe 10% of a single layer of paint and 100% of the stripper, I was left with a pile of orange goop in my tin and whole heck of a lot of paint still stuck on my dresser. Fail.

I figured it was time to chalk that one up as a failure (both earth-wise and financial-wise), and go for the old school hard-core nasty-bad-for-you-and-the-earth stripper. I'm not sure if it was the kind of paint that was used that was the culprit for the lack of effect; judging by the impact Citristrip had on the above-linked project at Centsational Girl, it may have been since hers was clearly latex paint and peeled off in a nice clean sweep. And mine...well...didn't. Enter chemical-ville stage right:


Take 2:


After only 5 minutes, this bubble party was goin' on.


And after another 20, she was ready to rock.


Time to scrape. Now, I am not wearing gloves in this photo. Nor did I test for lead paint, so...don't do it my way. However, I DID wear a mask, and since there was no dust (I was stripping, not sanding), I wasn't too worried. However, not wearing gloves was a bad idea and I don't recommend it. I got chemical burns all over my hands and forearms and they HURT. You don't notice when you get it on you, and then all of a sudden  you think, "Hmm...my arm hurts. What is that? Ow! OWWWW!!" Then you look down and see a tiny little dot of something on your arm and think, "Was I stung? OW! OWW!!! WTF??" Then you swipe your hand over your arm, and it helps a little bit, but then your hand starts to burn and your arm continues to get worse. After that, you run around your patio like an idiot looking for something to wipe all your skin on, such as a large tarp, grass, or nearby garbage bag. Just sayin'. Wear gloves. And not the latex ones--they don't work for this business. You actually need the chemical hazardous ones. Not that I know from experience or anything...


Ok, so back to stripping. Paint. Stripping paint. This tool is handy because of all of its shapes and nooks for getting multiple surface types. It's like a torch of awesome.


For easy paint removal/picking uppage, I just placed my bin at the end and sloughed my pile of goo right off the end and into the bucket. You should really use a metal receptacle, as the stripper can burn through plastic over time, but I had used mine with the lame-o Citristrip and knew I'd need another one later to denature the stripper.


After round 1, I hadn't reached wood. So I did another...and I uncovered this little gem. There was a different poodle on each drawer, some kind of decal. Cute but...not really. Interesting, but off it went.


After the last round, I was left with this. It wasn't perfect, but it was a major improvement and I decided to sand the rest off.


Before sanding, I wanted to deactivate the stripper so that I could handle the piece without that God-awful burning. So I grabbed some odorless turpenoid and a stripper scrubby (that worked GREAT by the way) and gave her a good rub down. It caught some little stripped bits here and there that I missed with the smooth scraper. Plus she was neutralized and ready to go!


This is where I would show you the after of her all cleaned up and ready. I KNOW I took those pictures, but I can't find them for the life of me...they should be with all the others one taken at the same time. My computer must have gotten hungry and eaten them. It's too bad, because the wood grain was quite pretty...although that's a bit of a giveaway for the fact that she ended up NOT stained or I'd take a pic right now. Oh man, are you totally on the edge of your seat? I know you are. Don't lie.


Sunday, April 22, 2012

A Video Review: The Pippa


I have certainly never done a video review before, but I decided to give it a go. This video is pretty long (about 19 minutes), as I haven't gotten to the point to learn what to cut out and what to leave in (it's much easier when it comes to written stuff...but I've had a lot of practice doing that, so hopefully this will get easier over time). I'm still learning the ropes of iMovie as I go, but I think I managed to come up with something that can answer peoples' questions about the Pippa!

It's a little nerve-wracking to purchase something that's $250 without getting to see, touch, and hold it in person first. I found a few reviews, both written and video, that were helpful, but they didn't really gather everything into one place. So I decided to have a go at a Vlog review! Like I say on my fashion page, and like I said above, I'm no fashionista and I'm certainly not a video-editing pro. But it was fun, and I'd love to hear feedback on what things to cut out, what people like, etc.

I do have one disclaimer: my lovely Canon Vixia HFR10 is a great camera, shoots awesome footage (especially in daylight), and is very user friendly for a beginner videographer (if you can call me that) like myself. However, the internal microphone picks up a subtle clicking noise within the camera that I have since learned is the auto focus. So excuse the clickity-clack chatter in the background, but sadly I have no external mic which is the only remedy I have come across!

Since the video is a bit long, here is a general breakdown of certain parts so you can skip to certain sections if you'd like!


  • Intro and Background: 0:00
  • Purchasing the Pippa in North America and the "Database": 1:25
  • Packaging: 3:05
  • Pricing: 4:10
  • General Overview and Description: 6:15
  • Sizing Comparisons: 11:05
  • Leather (Color, Feel, and Texture): 13:00
  • Some Nice Details: 14:25
  • Carrying and Storage Options: 15:20
  • Closing: 18:25


As a second caveat...after embedding this in my blog, I have no idea what on earth YouTube did to the lighting in my video; before and after each scene it gets really dark. That's certainly not showing in my editing on iMovie--sorry for the techno effects! Live and learn!

If you have any specific questions about the bag, I'd be more than happy to help if I can--feel free to leave a comment :)


Saturday, April 21, 2012

Channeling Pippa Middleton


Hey guys!

Ok, I totally admit it's been a long time since my last post. Working full time while still in graduate school on top of job hunting is a wee bit on the time consuming side.

However, given the above stressors, that also means that my graduation is coming up rather soon (22 days, but who's counting?). Given that I've become one of those handbag-and-shoe people (honestly, I never thought I'd be one of those girls, but hey, I like my girlie items...especially handbags and shoes...and nail polish...and glitter...and puppies. I like puppies a lot) I decided to invest in a big girl handbag. But being extremely picky and annoyingly logical, this was no easy decision. However, after months (yes, you read that right--months) of research and hemming and hawing and stressing and research and more stressing, I finally settled on a winner: the Modalu Pippa Medium Grab in Shark.


Why did I settle on this bag? Though it's true, this bag has become wildly popular thanks to Pippa Middleton's love affair with it in many a color, I actually didn't choose this bag because it is favored by the infamous Miss P; however, had the company not garnered so much attention because of her preference for their handbags, I probably would never have found it. Here are the reasons I eventually opted for this particular handbag.

Reasons I Chose the Pippa

  • The price point. While my research turned up many a gorgeous bag when typing in terms such as "best investment handbags" or "most loved handbags of all time" into Google, the G-Man often yielded Louis Vuittons, Chanels, and (*snort*) Hermes lovelies that were way way beyond my means. Kate Spade and even Coach were getting closer to a price range where I felt a little more comfortable, but I'm pretty picky about every angle, silhouette, color, texture, and smell associated with my handbags and I just wasn't finding the perfect match; I couldn't settle on one I was totally satisfied with, and if I was going to shell out $350+ for a bag I wanted to last at least a decade, I wanted to make sure I was 350%+ satisfied. There was a Coach bag I had seen at an outlet 2 years ago that I tried pretty hard to find, but not knowing every detail about the bag, it was impossible to track down, and I was getting sick of the snobby Coach store people practically rolling their eyes in my face as they tried to help such a noob locate a bag that was so 2 years ago. So I set a max budget of $300 and hunkered down to flush out something a little different. I resigned myself to the fact that I could, indeed, find a bag I loved that didn't cost a month's rent or a year's worth of gas (or should I say "petrol?" I did buy a British bag, after all).


  • The color. Finding a color that I felt would compliment just about any outfit at any time of year was difficult. White was really the only option that covered all the possible bases, but...well, knowing me, white was a bad idea for cleanliness purposes, as well as scratch resistance. Black mixed with brown is a huge pet peeve of mine, and I tend to gravitate much more toward browns instead of blacks when wearing dark colors since I'm so damn pale and black washes me out; so black was out. I loved the idea of red or yellow, but wasn't ready to drop a few Benjamins on such a bold statement piece that would likely be soon out of vogue. Gray was the next best solution I could come up with since it could really compliment just about any color (even brown if you're careful). Once I arrived at this conclusion, I fell in love with the idea of a gray bag. Trouble was, locating a gray handbag was hard. Surprisingly so. (I hope that's not a sign I have poor taste...I must just be ahead of the fashion world?) So when I found this bad boy, I was stoked (for more reasons than just the color, as pointed out in these bullets). And since this gray is just barely leaning toward the warm end of the spectrum, it seems like it will jive with just about anything (that was simply a lucky break--I was expecting a cooler gray--huzzah!). However, it comes in a slew of other colors that I also love, in case gray isn't really calling your name. Here are the nude, toffee, and black from Street Princess:


          If I had money to burn, I'd also consider it in Mint, which I love now, but know will be out of  
          style quickly:


  • The material. Despite one of my greener friends pointing out the fact that leather isn't exactly eco-friendly (and obviously not fur-baby friendly either), I decided that leather would be the best option in the long run since, if well-taken care of, leather would most likely outlast many other materials helping to even out the pro-con scale in terms of lives lost and energy spent. Additionally, most higher end handbags are leather, which provides more style options so that I could find a bag I really loved in a style I felt would last forever (*fingers crossed*). Quality over quantity in this case; I'd rather buy 1 handbag, even if it's leather, that will last 10+ years than buy 3 or 4 "greener" items that lost their luster, fall apart, or are in a less timeless style since there are far fewer items to choose from in the non-leather category.
  • The style. As already mentioned, I wanted this bag to hold up for years (if not decades) to come. That meant finding a timeless silhouette, size, and color that could surpass the test of time, fads, trends, and even minor abuse. I felt that the silhouette of this bag was elegant and classic and lent itself to both casual and chic needs; while the black detailing around the zippers isn't so timeless as I would like, it provides some nice contrast to bring interest to the bag. I prefer magnetic closures on my bags to zippers, but wasn't sure how a magnet would hold up over time, nor what it might do to various technological devices that would spend time in my bag such as a phone, credit card, and (hopefully sometime soon) an iPad. While zippers can break, they can often be repaired...magnets require taking the bag apart to replace, which made me nervous. If I'm gentle, these bad boys should last a while. I also liked the fact that the overall style of the bag could be dressed up or down depending on the use of the cross-body strap and outfit with which it's paired. So overall style gets an A!
  • The carrying options. I'm not usually a crook-of-the-arm kind of girl, which was a possibility with this bag due to the short handles. I took a chance that I might be able to fit the small rolled handles (love me some rolled handles--obsessed!) over my shoulder (if necessary) with this bag. I was much more hyped about the cross-body strap offered with the Shark color that has some adjustability options. Being an average height girl (well, a bit over at just shy of 5"6"), I'm lucky that this strap can be used for a shoulder or cross body carrying style. The rolled handles do barely fit on my shoulder, but it is one tight squeeze. Honestly, I wish the Pippa offered both the long handles and the cross body strap, but I could only get this color with the short handles and cross body strap; all other colors have longer handles and no strap. Decisions, decisions. I figured I'd take a chance on the short handles to get the color I loved and could fall back on the strap if needed (even doubling it over if I wanted to in order to make for a shorter shoulder-style bag). Plus, Pippa does look cute and stylish simply holding it by the handles in hand as well, and I admit, that does give it some nice sophistication. Or I could even--gasp!--become a crook of the arm girl. I became a handbag girl, so who knows? It does look cute on Pippa:


  • The multiple pockets. I'm an organizational Freak. Capital F. I very very much prefer (pretty much require) to have at least 1 pocket on the outside of my bag for my phone, and love 2 even more so that my phone can live in one, and my keys can live in the other without the danger of scratching up my precious iPhone. Given the precious cargo in these pockets, I prefer to have at least a magnet closer if not a zip. Check and Check for the Pippa. I also like more than one main pocket, but really dislike a skinny middle zip compartment that can't hold squat. This bag has a zip middle compartment, but it's the widest (though the shallowest as it's tucked down below, but that's Ok with me), so I've avoided the stupid what-the-heck-is-this-lame-thing-here-for-anyway middle zipper divider while gaining the luxury of not 2 large interior pockets, but 3. Woo to the hoo! Check, check, AND check. I was worried that, with the 3 compartments, there may not be any smaller organization pockets for travel purposes and/or further organization, but fear not! There is a small zip compartment (fully lined), and 2 slip pockets (1 x-small and 1 small) in the third large compartment. It's odd that they're in the third rather than the first (I'd prefer the one more outer to my carrying style on my right arm for easier access), but perhaps your items are more protected here. Or if you're a lefty (maybe there are more lefties over in the UK? They do drive on the other side of the road...), it works out great! So...check (and check again if you're a lefty or carry bags on your left arm). Plus, there's a nice zip pocket on the outside of the bag for flat items--I can see this being handy for a boarding pass, for example. Organization galore!
  • The liner. I know--this may seem like a weird one to some people, but I am uber picky about liners. One of the main reasons I ended up not getting my original top-choice bag (from the Dooney and Bourke Dillen II line), was because the liner was trendy, ugly, and a heavy-weight material that felt...just...not good to me. Cheap or something. This liner isn't as smooth and silky as I prefer (I like satiny liners best), but it's got 2 great things going for it: a subtle but sophisticated pattern and a light color. While light colors can show dirt more than dark ones, I'm a pretty clean person, so I'm not too worried about that. The big motivator for the light color is that it makes your life ten times easier when searching for an item in the depths of your bag because light liners = contrast. Contrast = visible items. Visible items = finding what you want quickly. Let's face it: we promise to pare down and be more organized when it comes to our handbags, but sometimes our carryalls become carry everythings that are bottomless abysses where the thing you need most is nowhere to be found and you feel like an idiot when you're standing in front of the security guy at the airport with a bazillion people sighing behind you as you dig for your license that you took out of your wallet 2 minutes earlier so you'd have it ready but is now lost in the dark depths of the black hole that is your purse. (No? Just me? Fine...you just wait until it happens to you when you take that next flight.) The subtle design with the Modalu shell emblem is a nice final touch that provides subtle contrast that, in my opinion, elevates a liner from "meh" to "me likey."
  • The general size. I like handbags that aren't too big or too small. Too small results in a bag stuffed to the gills that ends up looking bloated and is uncomfortable to carry because of all the weird lumps and bumps. Not to mention, the stress from the stuffing can weaken the material, pop zippers, and cause misshaping over time. However, bags that are too big can make an outfit look sloppy, cause you to look like the nanny carrying all the kiddies' items to the beach, or (most annoyingly) end up targeting you as the "carrier": the one everyone asks to hold their stuff 'cause "you've got room in there, right?" An everyday handbag is not a weekender bag, and shouldn't be the size of one either. But it has to be big enough to hold what you need. So this bag fell just right along the spectrum at around 13 x 10 x 6. As I haven't used it out and about yet, I can't comment to my fullest extent on the size:daily use ratio, but from a visual standpoint, it looks like it can hold the essentials plus a bit more without looking like a chipmunk hoarding noms for the entirety of winter. I will say, however, that the bag does not fit my 13" Macbook Pro, and I can likely assume it would not fit the larger Macbook Air either, as it's a width, not depth, issue when it comes to fitting in the bag. 15+ inchers are never even going to be a remote possibility. I'm guessing both the mini Macbook Air, a Netbook, and any of the tablets/e-readers out there would fit just fine most certainly in the outer taller pockets, and likely the middle pocket as well. Considering this is not a work bag, and I intend on becoming the proud Mama to an iPad sometime in the near future, not fitting my laptop isn't a major concern for me. But it's certainly something to keep in mind if it's important to you.  
  • The company's reputation. $250 dollars is nothing to sniff at when it comes to a handbag (though I'm sure there are plenty of people who are snorting right now as they read that). Thankfully, companies who put a lot of effort, thought, and care into their designs (which results in a higher price tag) understand that their customers have high expectations for their products. Modalu has a great reputation when it comes to the stand of their products over time, both from a design and function standpoint. While I obviously haven't had to contact them for an issue with the bag yet, I can assume that this wonderful reputation would follow through should something arise with my bag that becomes a problem. I know that Modalu not only willingly replaced a batch of Shark Pippas known to discolor over time, but they willingly put out a recall for the handbags on their Facebook page encouraging customers to e-mail a photograph of the bag for verification so that the bag could be replaced. Companies that own up to mistakes and work hard for a stellar reputation are worth the extra money in my opinion. I'm quite confidant that Modalu will be more than happy to handle any issues with my bag, should they ever arise (though I don't expect that for a while due to their careful craftsmanship). 


However, everything about this bag isn't ponies and rainbows (i.e. perfect in my opinion). But honestly, what is? So far (I haven't had it very long at all) there are a few cons to keep in mind, and these may not even be cons in your book, as they are more about personal preference. I don't want these to tarnish my glowing notes above, as I am very happy with this bag--these are just some little things to keep in mind!


A Few Cons About the Pippa

  •  Leather texture. I really really like my leathers to be super soft and very textured (hence, why I mentioned I was considering the Dillen II line from Dooney and Bourke--which does not come in gray, incidentally). The leather on the Pippa is barely textured and has a slight sheen to it. I totally understand that this is the type of leather most people prefer (hence, its popularity and widespread availability). The sheen may also help to hide minor blemishes that are sure to accrue over time. Textured leathers also tend to be quite heavy, which is a con. Personally, I just wish the bag was more textured; however, I like the fact that the bag itself is not overly heavy, which most likely would be the case were it more pebbled, as that requires a thicker leather, and hence, more weight. The leather is also not as soft as the pebbled leathers tend to be, which gives the bag a bit more structure so it's not too saggy, even when empty.
  • Zippers. While I like zippers on my outside pockets, I'm not a fan of zippers for main compartments. Yes, they are safer for keeping items contained because they run from one side to the other, but they are often bothersome in my opinion, as compared to a hidden magnet such as in the B. Makowski bags. However, magnets can also have their drawbacks, as mentioned above. These particular zippers on the Pippa worry me a little because of their dark contrast (black); they provide nice visual appeal, but I'm not sure how the style will fare over time (as in 5+ years--that may not be an issue for those who are far more trendy than myself, and will likely not have this bag for that long).
  • Smell. I'm headache prone beyond the beyond, and smells can be a trigger. My bag has an odd smell at this point (about a week after un-packaging) and it's not a nice leather smell...it's more of a packaging-slight-chemical smell. But I have the feeling this will dissipate over time...fingers crossed!
  • Handles. While I love the look of the rolled handles, they are a tad bit too short to go over your shoulder; they fit on me, but it's not exactly a comfortable resting place...hence, (I'm guessing), the redesigned bag with the longer handles, but no cross body strap. Like I mentioned above, maybe I will eventually evolve into a crook-of-the-arm girl, but for now, this bag is hard to carry comfortably on my shoulder, which is my go-to style.
  • Cross body strap. I know--confusing! I told you I loved the cross body strap. And I do! It's the actual design and how it attaches to the bag that's detracting from my original enamored state. The width of the strap, while nice a feminine because it's not too wide, is a bit too narrow if you plan on carrying a loaded bag over an extended period of time. There's no wider shoulder part to help dispense the weight of the bag over a larger area, which can make the strap dig into your shoulder if you're carrying the bag for a while, especially if it's heavy. However, it looks great, because it doesn't have any manly functionality, such as a wide shoulder rest. I'm also not a fan of how the strap attaches to the handbag itself. It's easy to clip on and take off, but because it hooks to the rings where the handles attach to the bag, it's awkward to find a way to get the handles to either lay flat or stay out of the way because the rings need to fold down for the handles to lay flush against the bag. Trouble is, when you attach the strap, the rings want to stand up, because gravity wants to pull the rest of the bag down (that sounds confusing--just trust me on this one). There are no other locations to attach the strap, so I'm constantly shifting things around to get this to lay flat, and that stay flush, and this to lead straight, etc.
  • Footies. Yep, the bag's got 'em on the bottom to help protect the bottom of the bag. But it only has 4. This bag is long enough and wide enough that it needs an additional pair in the middle. Not many people will see the bottom of the bag, but over time, I'm not sure if the wear and tear will start to damage the middle of the bottom of the bag.
  • Noise. This bag is...squeaky. Not a lot, but enough that you can certainly hear it. I'm not sure if it's because it's new and needs to be broken in, or if it will make little rubbing and creaking noises for the entirety of its life. This is probably my number one issue, and I hope it goes away! Given that you hardly ever have a bag in a noiseless vacuum, most other people probably wouldn't notice such a minor issue. But for some reason, it bothers me...probably more than it should. Here's to hoping she breaks in nice and soft and quiet!
  • Availability. Now that I have the bag, this is obviously not an issue for me anymore. However, this bag was not easy to track down, especially in this color. And as its demand goes up, so too does the price. Shipping internationally is expensive, especially if you need to pony up for currency-exchange fees, customs fees, etc. I happened to find a company in Canada (Town Shoes) that carries the bag in this color (though it will likely sell out quickly), but ordering was confusing, customer service was horrible, and they limit the number of bags you can purchase (you can't order the same color for another 12 months after purchase, and you can't order a second color for 6 months after your most recent purchase). They are also considering eliminating international shipping, which was a flat $20ish for me to go from Canada to the US. So purchasing this bag from Town Shoes may soon not even be an option outside of Canada anyway--sad face. That leaves Modalu as the only option I'm aware of (where the Shark color sells out within hours of coming into stock, as I found out not once, but twice). I have no idea what their international shipping rates are--sorry!


So that about sums it up. If you have any questions about the bag, I'd be more than happy to answer them! I'll be back soon with a detailed video review for you visual peeps out there, as well as a discussion of other bags I considered in case you're drawn to similar styles but, would rather grab a bag in stores.

Note: Photos/Original Images (in order) from here, here, here, here, here, herehere, and here.